Introduction: Why an Automatic Roof Vent Opener Matters for Your Riverstone 6×8 Wooden Greenhouse
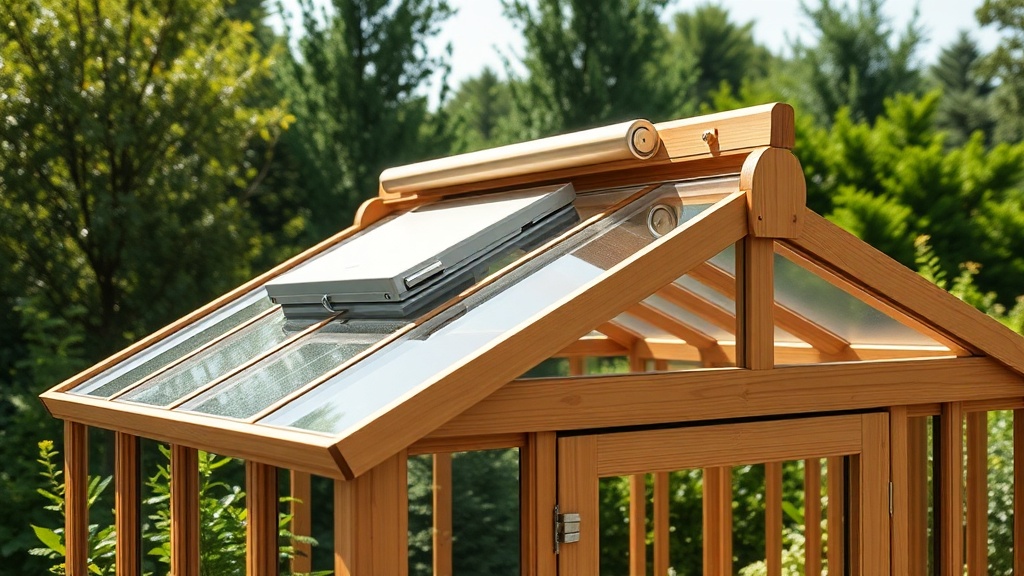
The Riverstone 6×8 Wooden Greenhouse offers a charming and functional space for extending your growing season, but like any greenhouse, it requires careful management of internal climate. Without proper ventilation, temperatures can spike dangerously high on sunny days, stressing plants and encouraging fungal diseases. Installing an automatic roof vent opener is one of the most effective upgrades you can make, ensuring consistent airflow without daily manual intervention. This guide walks you through selecting, installing, and maintaining an automatic opener tailored to the Riverstone 6×8’s cedar frame and single roof vent.
How Does an Automatic Roof Vent Opener Work in a Wooden Greenhouse?
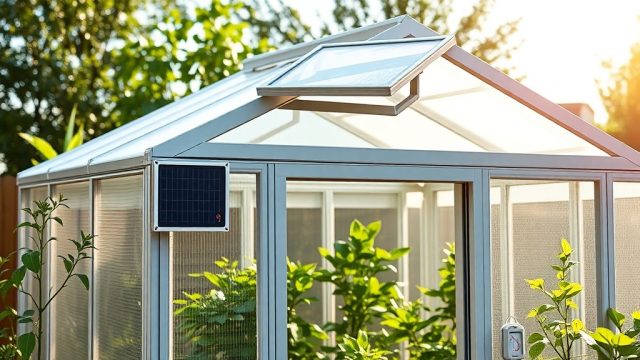
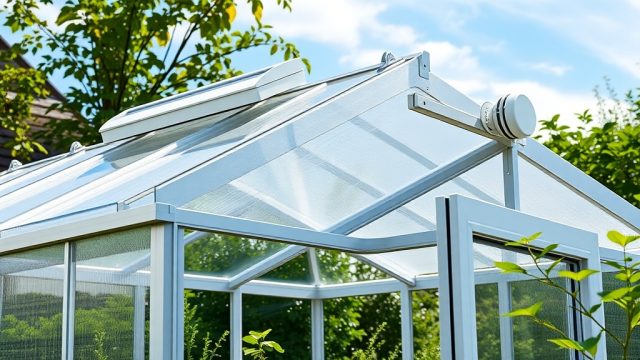
Automatic vent openers rely on a wax-filled cylinder that expands when heated, pushing a piston to lift the vent window. As the temperature drops, the wax contracts, allowing the vent to close. This passive system requires no electricity, making it ideal for the Riverstone 6×8, which often lacks built-in power outlets. The opener typically attaches to the wooden frame and the vent sash, using brackets and screws. For the Riverstone 6×8, the standard roof vent measures approximately 24 inches by 24 inches, and the opener should provide a lifting force of at least 7 kg (15 lbs) to handle the weight of the glazing and frame.
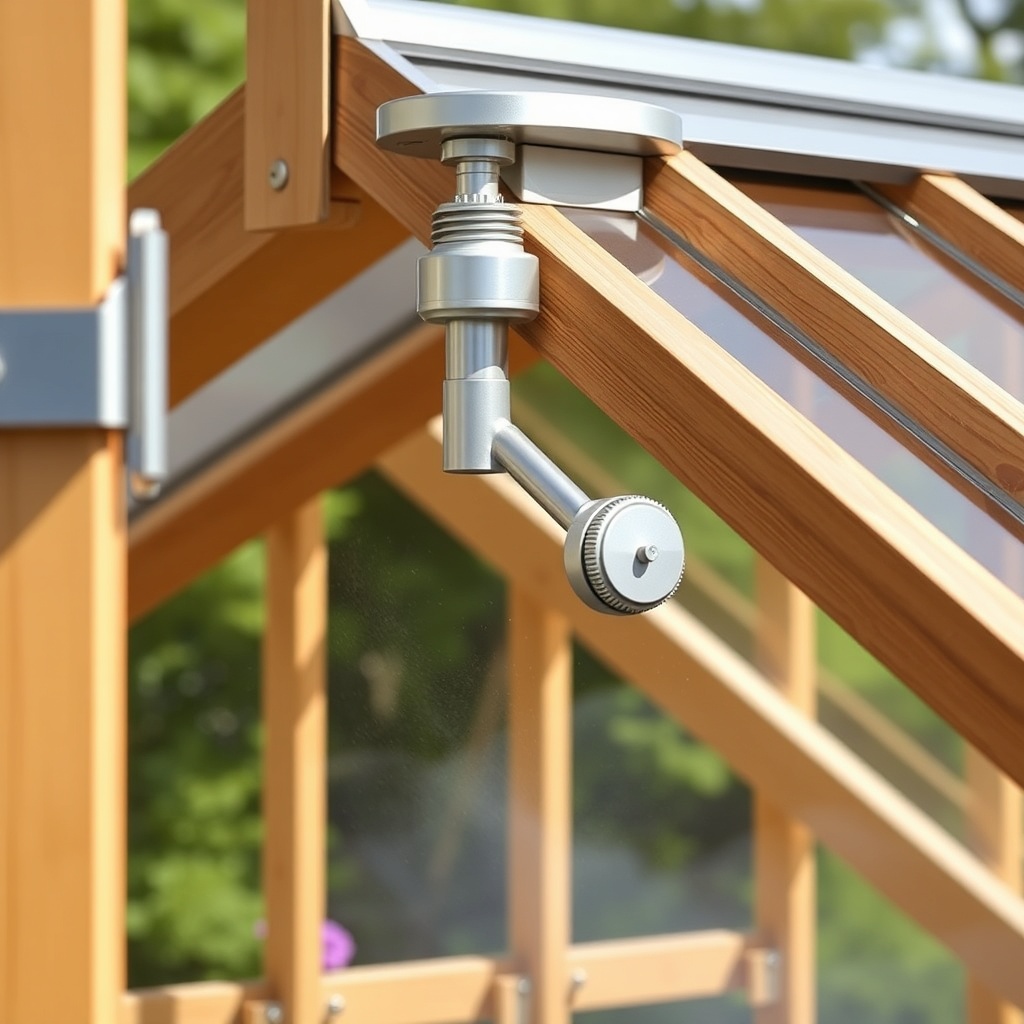
Key components include the cylinder unit, adjustable brackets, and a locking mechanism to prevent accidental closure. Most units open at around 22°C (72°F) and fully close at 15°C (59°F), though some models allow temperature adjustment via a knob. Because the Riverstone 6×8 uses horticultural glass or polycarbonate panels, the opener must be compatible with the vent’s thickness—typically 3 mm to 4 mm for glass or 4 mm to 6 mm for twin-wall polycarbonate. Always confirm the opener’s maximum stroke length (usually 300 mm to 400 mm) to ensure full vent opening.
Which Automatic Vent Opener Is Best for the Riverstone 6×8?
Not all openers fit the Riverstone 6×8’s wooden frame, which has a ridge beam depth of about 44 mm and a vent sash thickness of 20 mm. The following comparison table highlights three popular models that work well:
| Model | Lifting Force (kg) | Stroke Length (mm) | Temperature Range | Mounting Bracket Type | Price (€) | Best For |
|---|---|---|---|---|---|---|
| Bayliss Autovent Mk7 | 7 | 350 | 15°C–25°C | Aluminium L-bracket (wood-compatible) | €35–€45 | Standard glass vent |
| Vitavia Ventsolar 280 | 8 | 280 | 18°C–28°C | Steel right-angle bracket | €50–€60 | Heavier polycarbonate vent |
| Jenny Warmaxx 350 | 10 | 350 | 16°C–26°C | Stainless steel universal | €70–€85 | Larger or heavier custom vents |
The Bayliss Autovent Mk7 is the most common choice for the Riverstone 6×8 due to its reliable performance, easy adjustment, and affordable price. If you have upgraded to double-glazed polycarbonate panels, the Vitavia Ventsolar 280 offers higher lifting force without breaking the budget. For growers in very windy areas, the Jenny Warmaxx includes a locking pin that prevents premature closure.
Before purchasing, measure the distance between the vent hinge and the point where the opener bracket will attach. The Riverstone 6×8 typically requires a mounting hole placement of 250 mm to 300 mm from the hinge line. Always use stainless steel screws to avoid corrosion, and pre-drill pilot holes in the cedar frame to prevent splitting.
How Do I Prepare the Riverstone 6×8 Roof Vent for Installation?
Before mounting the opener, inspect the roof vent for any existing damage or misalignment. The Riverstone 6×8’s vent is held by two hinges and a manual latch. Remove the latch entirely, as the automatic opener will replace it. Clean the vent frame and the fixed roof frame with a mild wood cleaner, then sand any rough edges around the mounting area. Apply a coat of exterior wood preservative to the exposed surfaces—this is especially important because the opener brackets can trap moisture. For more on preventing moisture-related damage, see Riverstone 6×8 Wooden Greenhouse: Troubleshooting Common Rot Issues.
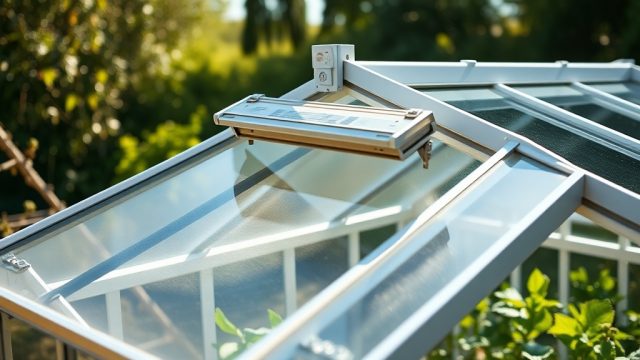
Next, mark the bracket positions on both the vent sash and the fixed roof beam. The lower bracket (on the vent) should be centered along the vent’s width, about 50 mm from the bottom edge of the sash. The upper bracket (on the fixed beam) should align vertically with the lower bracket when the vent is closed. Use a spirit level to ensure the brackets are square—misalignment will cause the opener to bind. Drill 3 mm pilot holes for the screws, then attach the brackets with stainless steel screws (supplied with most kits, but buy extras rated for outdoor use). Test the bracket alignment by temporarily holding the opener in place; the piston should move freely without rubbing against the frame.
If your Riverstone 6×8 has a manual vent stay, remove it completely. The automatic opener performs the same function but with temperature control. Keep the old stay hardware in case you ever need to revert to manual operation. Also, check the vent’s weatherstripping; if it’s worn, replace it now to prevent air leaks. A well-sealed vent works more efficiently with the automatic opener, reducing the frequency of cycling.
What Are the Step-by-Step Installation Steps for the Automatic Opener?
Follow these steps carefully to ensure smooth operation:
- Step 1: Attach the lower bracket to the vent sash using two M5 stainless steel screws. Tighten firmly but avoid over-tightening, which could strip the wood.
- Step 2: Attach the upper bracket to the fixed roof beam. Use the same screw size and pre-drill pilot holes. Ensure the bracket faces the vent side so the opener piston aligns vertically.
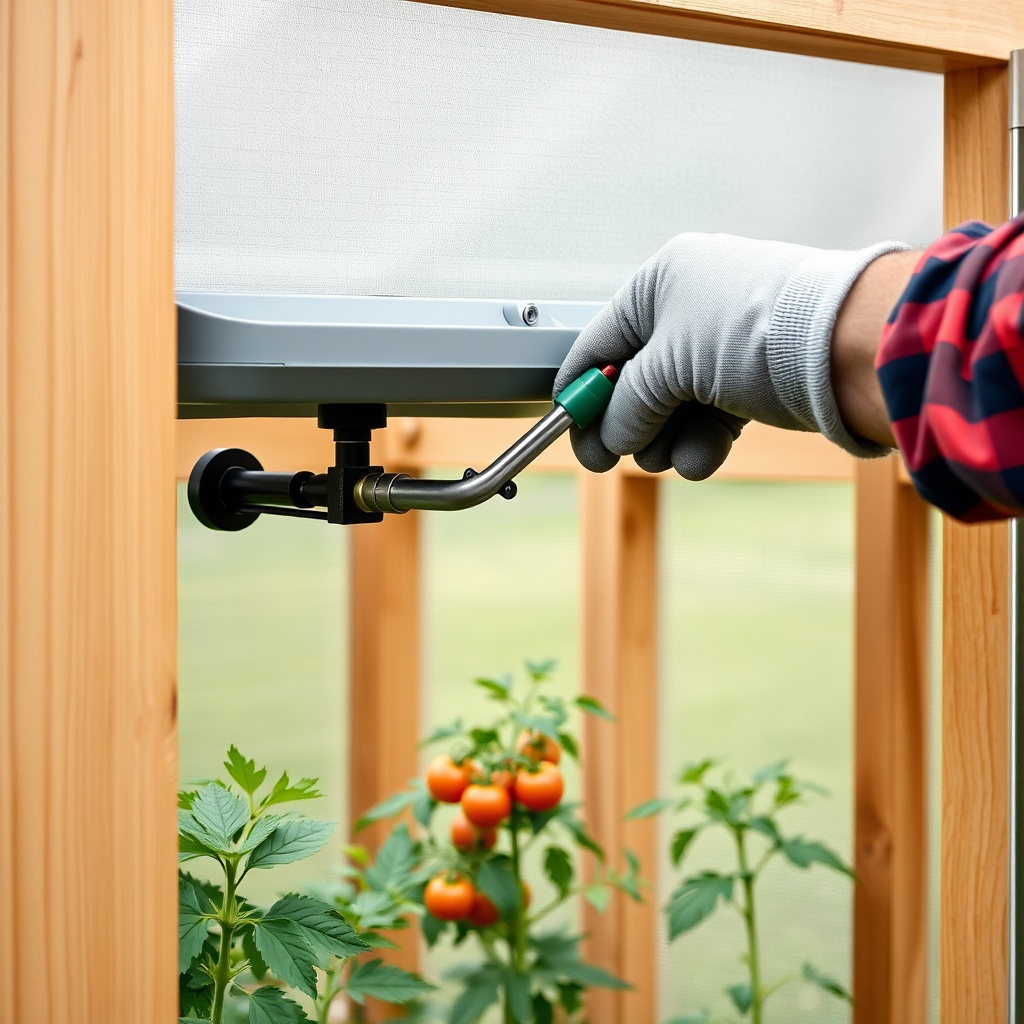
- Step 3: Install the wax cylinder unit onto the upper bracket. Most models use a pin-and-clip mechanism—push the pin through the cylinder eyelet and secure with the clip.
- Step 4: Extend the piston rod fully by hand (some units require warming to extend). Connect the rod’s end to the lower bracket using the provided pin. Ensure the piston is not twisted.
- Step 5: Adjust the opening temperature setpoint (if your model has a knob). For the Riverstone 6×8, set it to 22°C initially. Close the vent manually and check that the piston has 5 mm to 10 mm of free travel before the vent seals.
- Step 6: Test the system by propping the vent slightly open and warming the cylinder gently with a hairdryer (on low heat). The piston should extend smoothly. Allow it to cool; the vent should close fully.
- Step 7: Secure all screws with a dab of silicone sealant to prevent loosening from vibration. Apply a light oil to the piston rod to reduce friction.
If you encounter binding or uneven operation, check the bracket alignment again. The Riverstone 6×8’s wooden frame can swell slightly in humidity, so leave 1 mm to 2 mm clearance around the piston rod. For more in-depth ventilation planning, read Riverstone 6×8 Wooden Greenhouse: Ventilation Strategies for Healthy Plants.
How Do I Maintain the Automatic Vent Opener in a Wooden Greenhouse?
Regular maintenance ensures the opener lasts for years. In autumn, clean the piston rod with a soft cloth to remove dust and pollen, then apply a silicone-based lubricant. Avoid petroleum-based products, which can damage the wax seal. Check the screws twice a year—tighten any that have loosened due to wood movement. The Riverstone 6×8’s cedar frame can shrink in dry weather, so inspect the bracket fit after heatwaves or dry spells.
During winter, if you are not using the greenhouse, remove the opener and store it indoors. The wax cylinder can degrade if exposed to freezing temperatures for extended periods (below -10°C). Alternatively, install a Riverstone 6×8 Wooden Greenhouse: Best Insulation Options for Year-Round Growing to protect the opener from frost. For cold-climate growers, integrating the vent opener with a heater is crucial—see Riverstone 6×8 Wooden Greenhouse: Best Heating Solutions for Cold Climates.
If the opener becomes sluggish or fails to close completely, the wax cylinder may need replacing. Most manufacturers sell replacement cylinders separately. Signs of failure include the vent staying open on cold days or not opening on warm days. Also, check the piston rod for rust—stainless steel rods are preferred. For the Riverstone 6×8, replace the opener every 3 to 5 years, depending on exposure to UV and rain.
What Do Owners Say About Automatic Vent Openers on the Riverstone 6×8?
Owners frequently report that adding an automatic vent opener transforms their experience with the Riverstone 6×8. Many note that the greenhouse stays within 5°C of outdoor temperature on sunny days, compared to 10°C–15°C above without automation. One owner from the UK commented, “I installed a Bayliss Mk7 and now I don’t have to rush home at lunch to open the vent. My tomatoes have never looked better.” Another owner in Germany mentioned that the opener allowed them to grow peppers successfully, as the consistent airflow reduced humidity-related blossom drop.
A few common complaints include the opener not lifting the vent if the frame is slightly warped. This is more frequent in older Riverstone 6×8 units where the wood has twisted. In such cases, owners recommend planing the vent edge by 2 mm to 3 mm to ensure free movement. Others have found that the opener’s temperature adjustment knob is not very precise, but they compensate by setting it a few degrees lower than desired. Overall, satisfaction is high, with many calling it an “essential” upgrade for busy gardeners.
For integration with watering systems, some owners connect the vent opener to a Riverstone 6×8 Wooden Greenhouse: Installing a Drip Irrigation System for Efficient Watering to further automate the greenhouse environment. Combining automatic venting with drip irrigation creates a near-self-regulating microclimate, reducing daily chores significantly.
Frequently Asked Questions
Q1: Can I install an automatic vent opener on a polycarbonate roof vent for the Riverstone 6×8?
A: Yes, but ensure the opener’s lifting force matches the vent weight. Polycarbonate panels are lighter than glass, so a 7 kg opener is usually sufficient. Use brackets designed for polycarbonate to avoid cracking the panel.
Q2: How do I know if the opener is strong enough for my Riverstone 6×8 vent?
A: Calculate the total weight of the vent (frame + glazing). For a standard glass vent, weight is about 5 kg to 8 kg. The opener should have a lifting force at least 1.5 times the vent weight. A 7 kg opener works for most standard vents.
Q3: Will the automatic opener work during power outages?
A: Yes, the wax cylinder system is entirely mechanical and does not rely on electricity. It will continue to function in any weather as long as the temperature fluctuates.
Q4: How can I prevent the opener from closing during a sudden summer storm?
A: Some models have a lockable feature. Alternatively, install a manual override chain that allows partial closure. For heavy rain protection, consider adding a rain sensor that overrides the opener.
Q5: What is the best temperature setting for the opener in a Riverstone 6×8?
A: Start at 22°C (72°F) for most plants. For heat-sensitive crops like lettuce, reduce to 18°C. Monitor internal temperature with a max/min thermometer and adjust as needed.
Q6: Can I install two automatic openers on the same vent for extra force?
A: It is possible but rarely necessary for the Riverstone 6×8. If the vent is very large or heavy, two openers can be mounted symmetrically. Ensure they are synchronized to avoid binding.